Follow me in other places!

Follow Me on Pinterest

Tuesday, August 24, 2010

Hell's Angel cake

UPDATE! I have now started my own cake making company! Please visit my facebook page https://www.facebook.com/CustomCakeStudio and give it a like! :-)

This one I made for my friend's Dad's 60th birthday!


I baked 2 maderia cakes and stuck them together. Then I covered them in buttercream and then a layer of black fondant. I printed out the logo for Hell's Angels and stuck it to card. This then gave me the templates for the shapes for cutting out the white area's, and templates for the font and the picture in the middle.

I cut out each letter for the writing, pressed them into the fondant to give an impression, and then painted them with red food colouring paste. I had to make up the letters that were not in the logo!

For the picture in the middle I again pressed the template into the fondant and then painted in the colours. I left it all to dry and then did the outline work with black piped fondant.


I then made some grey piped icing to do the detail on the wings.

Apple and Crazy cake!

UPDATE! I have now started my own cake making company! Please visit my facebook page https://www.facebook.com/CustomCakeStudio and give it a like! :-)

This was a joint cake for two friends! One friend loves Apple (as in the computer company!), loves their X-box and has a favourite hat, so I decided to try and make all of these out of cake and icing! My other friend loves colours and craziness, so I got some other friends to help me cover that cake with random shapes and flowers!

Here is a picture:

Both cakes started as square madeira cakes. The 'crazy' cake I just covered in buttercream and then covered in rolled fondant, but instead of just uising white I put white and purple together to make a marble affect. Then we covered it in stars and flowers and things, all made from different coloured fondant.

The Apple logo I printed from the internet, stuck onto card and then used as a template to cut the cake into the right shape. The bit sticking up out the top is rice krispie covered in fondant. The xbox pad and hat were just fondant too!


My birthday!! Cakes made for me!

So it was MY birthday! YAY! And some of my amazing friends, including my wonderful finace, made cakes for me! Here they are!

This is a Pikachu cake as I love Pikachu!


Next my friend made me a '30' cake, as that's how old I am!


Next came a cake that is supposed to be me! Hehehe!


And lastly came a Buffy cake, as I love Buffy as well!


And this was what was left after the party!


I've never been given 4 cakes for my birthday before!! And they were all different and amazing!

Welcome Home Ski Mountain Cake

UPDATE! I have now started my own cake making company! Please visit my facebook page https://www.facebook.com/CustomCakeStudio and give it a like! :-)

This cake was for a friend who's birthday I missed because he was being a rep out in France during the Ski season. So as I missed his birthday I made him a welcome home cake instead!


I basically made 2 madiera cakes and got some rice krispie bars, and then piled them all up on top of each other! I used the rice krispie to try and make slopes, and I used buttercream inside to stick it all together. Then I put buttercream over the whole thing, put down a layer of white rolled fondant, and then made trees out of green fondant.

The final touch was a bit of icing sugar for snow, and 'Welcome Home' written in chocolate!


Robot cake

UPDATE! I have now started my own cake making company! Please visit my facebook page https://www.facebook.com/CustomCakeStudio and give it a like! :-)

This was a cake I did for my fiancés Dad, as he used to love the 50's style robots as a child!


It was just a madeira sponge cake, with rolled fondant on top. I used liquorice for the nose and lollipops for the antennas either side of his head!


Transformers Autobot cake

UPDATE! I have now started my own cake making company! Please visit my facebook page https://www.facebook.com/CustomCakeStudio and give it a like! :-)

I love actually love transformers (my brothers and I had loads of transfomer toys as kids, and the original cartoon movie was one of the first I saw at the cinema!) so I was very excited to do this cake for my friend's birthday as he is a big transformers fan too.

I started by baking two maderia cakes and putting them next to each other on the cake board. Then I printed out a large picture of the Autobots logo and stuck it onto card. I used this as a template to get the right shape. Then I cut out the coloured panels in the logo, to leave me with a template for the 'grooves' around the features. I then knew exactly where to carve my cake to give it a good 3D look.

Next I covered the whole thing in buttercream and then a layer of black rolled fondant. When I put the fondant down I made sure I pressed it into the grooves so that they would show up nicely.

Then I cut out panels in white and stuck them onto the cake. These I painted with food colouring, although I used paste colours rather then liquid as you have much more control over the amount on the brush, and you can achieve better fading effects.

Here are some pictures of the final cake! The last one really shows the grooves:


Reggae Cake

UPDATE! I have now started my own cake making company! Please visit my facebook page https://www.facebook.com/CustomCakeStudio and give it a like! :-)

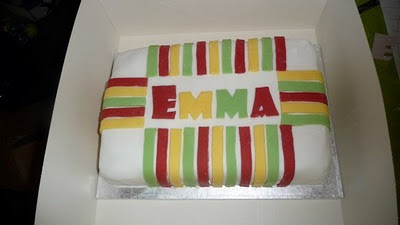
This was a cake I made for my friend Emma's birthday as she is a big reggae fan!

I started by baking 3 seperate maderia cakes, one with a little red food colouring, one with yellow and one with green!


Then I covered all of the cakes in a layer or buttercream, and then put down a layer of rolled fondant. Next came some details, such as Emma's name...


As you can see the top left hand corner dropped down a bit, so I obvioulsy didn't trim the top off very level! But my friend loved it which is all I am ever worried about! I'm so annoyed with myself though because I forgot to take the camera out when I gave it to her, so I dont have a picture of the cake cut but it did look very cool with the 3 colours! (And I was worried people wouldn't want to eat green cake, but actually they all loved it!)

Friday, August 20, 2010

Kill Audio cake (3rd Coheed and Cambria cake!)

UPDATE! I have now started my own cake making company! Please visit my facebook page https://www.facebook.com/CustomCakeStudio and give it a like! :-)

This cake was epic to make, an so I actually have a lot of 'making of' pictures to try and help show the process!

For those of you that dont know 'Kill Audio' is a comic book character so the design of this cake was quite easy as I just had to print off a picture Kill Audio for my template. The first thing I did was bake two madira cakes. I added a bit of red food colouring so that they would be pink like flesh:


Then I used the template which I had printed out (and stuck onto cardboard) to cut the cake into the correct shape. I then cut off things like the head from the template so that I could lay these on top and carve out the shapes of these parts.


I used rice krispes bars (chocolate ones in this case!) to build up the hair and for the nose, and make grooves into the cake for the eyes.


Then I covered the whole thing in bettecream!


Next came a layer of white icing over the whole thing:


I made sure that I really molded the icing around the features, especially the nose and eye sockets! Kill Audio is grey in colour, so the next thing I did was to spray all the 'skin' areas lightly with a black food colourung spray:


Then I just slowly built up all the details like the clothing and wristbands:


Then the hair and the eyes etc, until it looked really good! The next part was adding all the knives sticking out of his body. I should have made these from flowerpaste, but I didn't know what that was at the time. (Flowerpaste is just like sugarpaste - i.e. rolled fondant - but it dries much harder). As a result my knives ended up folding over and breaking, but it all added to the look. I then went a bit crazy with red piped icing to do all the blood!


And here is a pic of the cake cut open, to show the pink insides!


Coheed and Cambria Neverender cake

UPDATE! I have now started my own cake making company! Please visit my facebook page https://www.facebook.com/CustomCakeStudio and give it a like! :-)

This is the 2nd Coheed and Cambria cake I have made (1st is here: http://whatanawesomecake.blogspot.com/2010/08/coheed-and-cambria-keyworks-cake.html)

It was a 12 inch square madeira cake which I covered in buttercream and then black fondant. I printed and then cut out the picture, stuck it to card and then cut it out again in the various 'parts' that you can see. I pressed these into the fondant which left an impression behind, and then I used gold edible paint and literally just painted over the top.


It took a few coats of the paint, and I didn't have much time to do this one so as you can see the cake is really shiny as I didn't leave it to dry, and there are lumps in the fondant where I rushed putting it on! If I'd have taken more time it would have come out much neater! It was delicious though and the person I made it for loved it, which for me is the main thing!

Jack Daniels and Wine Bottle cake

UPDATE! I have now started my own cake making company! Please visit my facebook page https://www.facebook.com/CustomCakeStudio and give it a like! :-)

This cake was for a joint birthday! I baked two chocolate cakes, I think the dimensions were 12 x 4 inch cakes, but I dont remember now. Then, before doing anything I printed off a picture of the Jack Daniels logo, and found the most expensive bottle of Pinot Grigio that I could find and printed off that label too! Then I used the cut outs to help me shape the two cakes. I covered them both in buttecream and then the coloured fondant (which I bought in the colours you can see from here:http://www.cakescookiesandcraftsshop.co.uk/)
and then let them both dry overnight before attempting any of the detail work.


To make the label on the Jack Daniel bottle look at close to the real thing as possible I put the label I had printed out onto card and then cut the indiviual letters of 'Jack Daniels'. I then pressed these onto into the fondant to give and impression of the letters, and then just filled this in with white piped icing. The same is true of the 'Tennesse' and 'WHISKY' at the bottom of the label. All the rest was just done freehand, which is why its a bit wobbly!

Cath Kidston inspired cake

UPDATE! I have now started my own cake making company! Please visit my facebook page https://www.facebook.com/CustomCakeStudio and give it a like! :-)

This is a cake I made for my friend's mum's birthday party.

It is a Cath Kidston inspired design as my friend wanted something along a 50's kitsch theme. I made a 12 inch square chocolate cake which I covered in buttercream and then iced in pink rolled fondant.


My friend and I then cut out the centre panel, making a border for it out of blue icing, and stuck it on. Then we cut out loads of small white circles out of white rolled fondant and laid them on top, making sure we were happy with the poistion, before sticking them down too. Next came all the little details, such as strawberrys that we made from red and green fondant:


We also bought some little flowers, and then made leaves for them from green icing. The last touch was a star on the front panel:


My friend then iced her mum's name etc into the panel before the party!

Arsenal themed Dartboard cake

UPDATE! I have now started my own cake making company! Please visit my facebook page https://www.facebook.com/CustomCakeStudio and give it a like! :-)

This was a cake I made for my friend who is a big Arsenal fan, and who plays darts!

I baked a 12 inch round chocolate cake for the base, covered it in buttercream and then put down a layer of white rolled icing. Then I printed out a picture of a dartboard which I stuck onto card and cut out. I laid this onto the top of the cake (after letting it dry overnight) and marked the circle with a cocktail stick. Then I cut out one of the sections of the dartboard and used this as a template for the red icing shapes.


It was then a case of slowly cutting out red shapes and sticking them on, leaving gaps for the white, until I had got all the way round. I then used black piped icing and did the lines on top, and then wrote out all the numbers!

Ipswich Town Football Club cake

UPDATE! I have now started my own cake making company! Please visit my facebook page https://www.facebook.com/CustomCakeStudio and give it a like! :-)

This cake I made for my fiance for his birthday as Ipswich are his team! I actually have a couple of 'making of' pictures for this one too!

So the first thing I did was to bake 2 chocolate cakes. Then I printed out the Ipswich crest and stuck it onto cardboard and cut it out. I laid this onto the cakes so that I could cut around it to get the right shape. I knew that it would be hard to try and cut the turrets (at the top of the crest) out of cake without them breaking off, so I decided to use rice krispie treats. I could have made my own, but I just bought the bars from my local shop!


As you can see its actually better that I used these anyway as they stuck out around the sides of the cake at the top too. Here is a close up shot:


The next thing I did was cover the entire cake with buttercream so that I could put the first layer of icing down, which was red. I paid special attention to the turrets made of rice krispie cake as it was quite hard to ice around these without tearing the fondant, but it seemed to go alright. There were a few gaps so I just got extra red fondant to fill these in. After putting down the red icing I then cut out blue strips and the large blue panel which I stuck onto the top with a tiny bit of water:


To make sure these parts were the correct size and in the correct position I went back to the cardboard crest that I had and cut out the various parts, using these as the templates for cutting out the shapes in the blue fondant. I could then use the template of the crest (which now had holes in it where I had cut out the varuios pieces!) to mark the positions onto the red icing, which I did lightly with a cocktail stick. Once I had stuck the blue pieces on top you couldn't see the marks I had made. I then left the cake overnight because the fondant gets wet due to the buttercream underneath, which makes it annoying to decorate. It's much easier to let it dry.

So the next step was to add in all the details:


I used white piped icing for most of it, but I chose to do the horse out of white rolled icing. And again all I did was cut around the horse from the cardboard template and use this to cut out the white fondant and then I stuck it on top.


Friday, August 13, 2010

Coheed and Cambria Keyworks cake

UPDATE! I have now started my own cake making company! Please visit my facebook page https://www.facebook.com/CustomCakeStudio and give it a like! :-)

So this one I made for one of my friends who loves Coheed and Cambria (who are an awesome band from New York in case you’ve never heard of them!)


I baked two chocolate sponge cakes and stuck them on top of each other using buttercream. Then I covered the whole cake in more buttercream and then a layer of white rolled fondant.


The design on top is called the ‘Keywork’ and I just used piped icing to draw it on top. I was VERY worried that I would muck this up completely! So I made sure started slowly and built up the design gradually.

I then rolled out black icing (which I bought ready coloured after learning my lesson from the Totoro cake!) and using templates that I had made (by printing out pictures and sticking them to card) I cut the black icing shapes out and stuck them to the side of the cake. As you can see in the pictures my cake was a bit lopsided on one side!


Totoro Cake - the first cake I made! - となりのトトロのケーキ

UPDATE! I have now started my own cake making company! Please visit my facebook page https://www.facebook.com/CustomCakeStudio and give it a like! :-)

This is the first cake that I ever made! It was a chocolate sponge cake with vanilla buttercream and then rolled fondant on top. The whiskers were made from liquorice which I just cut up into the right shape:


To make sure that he looked right I printed a picture of him out on A3 paper which I then stuck to card (a cereal box!) and cut out. I had baked two chocolate sponge cakes, one was square and one was round (I forget the size of them now...) and I put them together onto a chopping board and then laid my template on top. I cut round the main shape and then places both parts onto the cake board (making sure I stuck them down with a little buttercream).

Then I covered the whole cake with buttercream and got my rolled icing ready. I used white icing and black food colouring (the paste kind, not the liquid) to make grey although I didn't realise how long it would take to kneed the colour through! My hands certainly got a work-out!

Then I covered the whole cake with the grey rolled icing. To make sure I got the white shape correct for his tummy I went back to my cardboard template and cut the tummy out, and then used this as my template for cutting out the white rolled icing. To stick the white icing onto the grey I used a tiny amount of water.

Next came some green food colouring and a little white rolled fondant to make the leaf on top of his head. Then I cut out the eyes and the grey bits for the detail on the stomach. The worst part was actually the nose as I had to use so much food colouring to get the white fondant a proper black colour (and not just grey) so it was really wet and when I stuck it onto the cake I ended up getting a bit of liquid which tried to run down the cake! I quickly sorted this out with some kitchen roll, but it left a shiny spot above the nose.


UPDATE! I have now made Rice Krispie Totoro's! See them here! With step-by-step instructions!